I am so excited to share with you my first earring tutorial, I am going to make this a simple tutorial.
Ready? 🙂 It will be easy I promise!
What you’ll need…


The pliers I got from Walmart, they are not the best quality but they work just fine for me. I have gone through several pairs of wire cutters but they aren’t terribly expensive. The beads, head pins, and earring hooks have come from either Hobby Lobby, Micheal’s or Ben Franklins.
Step 1) Take your head pin and one bead and slide it down to the bottom of the head pin. Please make sure your bead is not going to fall off. If it does, you will need to chose a bead with a smaller hole.

Step 2) Take your flat nosed pliers, and get them close to your bead, then bend the headpin at a 90 degree angle. 
Step 3) Take your wire cutters, and measure out around 1/4 to a 1/2 down from your 90 degree bend, then cut off the excess wire. (don’t worry if you have a little more or a little less, just make sure you leave the same amount on the other earring) 
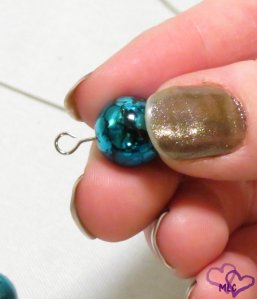
Step 4) Take your round nosed pliers, and start at the end of the wire you just cut and make a loop. 
It should look like this after you are finished.

Step 5) Pick up your round nosed pliers, and your flat nosed pliers and place then on either side of the loop you just created. Take the pliers that are on the cut side of the loop, and push them away from you, this should have caused the wire loop to open. Do NOT pull the loop opened.

Step 6) Slide on your earring hook, and close the loop you created. Make sure there is not a gap, you don’t want your new earrings to fall apart on you. 🙂 Be sure you check the loop on the earring hook as well for gaps, sometimes they are not closed all the way. 
Step 7) Repeat steps 1-6 for the other earring.

Step 8) Enjoy your new earrings! And also if you want to take a pretty picture of them remember to remove the pliers from behind them. Whoops! haha
I hope this helps you to create your own earrings!
I of course did not come up with this idea, this is just my steps that I use when making my earrings.
If you have any questions, please feel free to ask, I’d love to hear from you! Better yet, I’d love to see the earrings you create!
I hope this is just the first of many tutorials that I can share with you. What would you like to see in the future?
I hope everyone was safe from the storms that came through today. My house is still standing, I just can kayak in my neighbors front yard again, to bad its dark out how. haha
Mary
Where to find me
